XCode 4 is incredibly slow

XCode 4 has always been incredibly slow for me. The first release, 4.0, was especially bad. But that was just a .0 version. The next release 4.1 is much better, but it has also severe drawbacks, concerning performance. Everytime I start it, and not even do much with it, my system gets incredibly slow. That is on both a C2D 2.8 GHz MBP and also on a quad-core i7 MBP. Both machines come with 4 GB of RAM, and after firing XCode up and loading a large project, still at least 500 MB of it remains free. However, speed is abysmal. I just found the tool vmmap in OS X, and it gives me this output:

==== Summary for process 32136
ReadOnly portion of Libraries: Total=265.8M resident=114.4M(43%) swapped_out_or_unallocated=151.5M(57%)
Writable regions: Total=16.2G written=149.6M(1%) resident=360.9M(2%) swapped_out=6156K(0%) unallocated=15.9G(98%)
REGION TYPE                      VIRTUAL
===========                      =======
CG backing stores                  19.4M
CG image                            268K
CG raster data                     2840K
CG shared images                   3472K
CoreAnimation                       180K
CoreGraphics                         16K
CoreImage                           108K
CoreServices                       1704K
IOKit                              61.2M
MALLOC                            337.4M        see MALLOC ZONE table below
MALLOC (reserved)                  15.6G        reserved VM address space (unallocated)
MALLOC freed, no zone              30.5M
MALLOC guard page                    64K
MALLOC metadata                   128.8M
Memory tag=240                        4K
Memory tag=242                       12K
Memory tag=243                        4K
Memory tag=249                      156K
Memory tag=251                       64K
OpenCL                               60K
OpenGL GLSL                        1372K
OpenGL GLSL (reserved)              128K        reserved VM address space (unallocated)
SQLite page cache                  14.6M
STACK GUARD                        56.1M
Stack                              19.7M
VM_ALLOCATE                        16.1M
__CI_BITMAP                          80K
__DATA                             33.9M
__IMAGE                            1256K
__LINKEDIT                         59.5M
__TEXT                            206.4M
__UNICODE                           544K
mapped file                        72.9M
shared memory                      13.6M
===========                      =======
TOTAL                              16.7G
TOTAL, minus reserved VM space      1.1G

So the virtual memory space that XCode takes is more than 16 GB! The actual memory taken is “only” 1.1 GB, which is still huge, but my Emacs also takes 500 MB with tons of C++, Python and LaTeX buffers open.
The question is: can the unallocated, but reserved 16 GB address space degrade the performance? I have too little knowledge of the workings of virtual memory on Intel CPUs under OS X. But this value seems incredibly huge.

Update: I have asked a question on Stackoverflow, and have gotten some useful answers. What did help was removing my build/ folder from the git. Accidentally, a colleague checked in four files in the build/ folder. This made Xcode very slow, since it was checking the git status during compilation all the time. Still, Xcode 4 is much slower than Xcode 3 after this. So I also upgraded our machines to have at least 8 GB of RAM. This was definitely much of an improvement. It seems that development machines using Xcode 4 should have 8 GB RAM minimum. The more, the better…

LaTeX formulas in gnuplot

As a reminder to myself: On the TeX Stackexchange, there is a nice question and discussion by me and some helpful people on how to use LaTeX code in gnuplot / how to embed LaTeX equations in a plot. A copy of my revised answer:

First, we set up a gnuplot called test.plt:

plot [-5:5] [-1.5:1.5] sin(x+pi) title "$\sin(x+\pi)$"

Then we also set up a small Makefile:

.SUFFIXES: .plt .tex .pdf


%.tex: %.plt
gnuplot -e "
set format '$%g$' ;
set terminal epslatex standalone color ;
set output '$@'
" $<

%.pdf: %.tex
pdflatex $<

all: test.pdf

Running “make all” will produce this plot:

Emacs other-window backwards

I am currently writing a lot of text in Emacs, and I need to work on multiple files in parallel. So I use the split window functionality a lot. With C-x o you can switch to the next split window. However, it would be nice to go backward as well. The solution is simple, and is given on Stackoverflow and some other blogs:

(defun prev-window ()

(interactive)
(other-window -1))
(global-set-key (kbd "C-x p") 'prev-window)

Just put this in you init.el, and you can cycle backwards using C-x p.

SSL Everywhere for Safari

The EFF has published a Firefox extension to force HTTPS on as many websites as possible. This is a good idea(tm). But on OS X I use Safari, not Firefox. So I was wondering if there is a similar extension for Safari. It turns out there is. However, this extension is available in source only. The reason for this is given in a blog post by the developer. In short: The Safari extension API is limited, and the extension cannot guarantee that all your session cookies are transferred via HTTPS, making you vulnerable to stuff like Firesheep. And that is a bad thing(tm). But it is still useful, since it will redirect you to secure versions of the websites. One thing to note when following the build instructions: You need to enroll in the free Safari Dev program, and get a developer certificate. This is very well described over at Apple’s developer center. After that, you can enable the developer menu in Safari’s settings and just install the extension from the cloned git repository.

What are the best Web Galleries?

I am one of the few avid MobileMe users. I use the gallery and like it. Nice upload features, integration into iPhoto. Not perfect, but it does the work, plus I have lots of disk space. However, Apple makes the transition from MobileMe to iCloud. During this transition, several features of MobileMe will be dropped. Besides the very useful syncing of keychains between computers, the gallery will cease to function. Some strange photo stream service will be introduced, which does not seem to be a real gallery replacement, but more like a large cache of you last 1,000 pictures taken. Useful, but only to a limited extent. So what are my alternatives? I need (in order of importance):

  • Share with other people (who are not signed in, a la Facebook)
  • 5-10 GB space for pictures or more
  • Able to make photo albums, user gets a nice web browser based viewer
  • Option for users to download the photos
  • Optional high resolution versions of photos (2048 pixels or more)
  • Good integration with iPhone, iPhoto et al.
I would pay for that service, if it includes 10 GB space or more. 
I already found out that Flickr and Picasa Web offer unlimited space, but in the free version there are quite the restrictions (limited image resolution, image usage by hoster, limited number of photos that can be controlled, advertisements, …). Plus for example the Picasa Web Uploader for the Mac is horribly outdated (iPhoto ’08…?).
So what other options are there? Which one is the best?

Switching the active branch in a bare git repository

If you ever need to delete the “active” branch in a git repository, you need to first switch the active branch. Because you cannot delete the branch you are sitting on… You cannot checkout a branch, as you would usually do. You have to change the symbolic reference called HEAD. You can do this with the symbolic-ref command:

$ git branch
* deletethis
somebranch
$ git symbolic-ref HEAD refs/heads/somebranch
$ git branch
deletethis
* somebranch
$ git branch -d deletethis

Accessing the keychain in OS X from the command line

There is a very useful utility called security(1) in OS X, which lets you manipulate your keychain from the command line. You can easily im- and export keys and certificates using this. This is especially useful for AppStore developers, who code on multiple Macs. Having the signing keys in sync is kind of a challenging solution, if you don’t use keychain syncing via MobileMe. For example you can import a key like this into your login keychain:

$ security list-keychains
"/Users/yourguy/Library/Keychains/login.keychain"
"/Library/Keychains/System.keychain"
$ security import -k /Users/yourguy/Library/Keychains/login.keychain somekey.pem
1 key imported.

Hope this helps.

Installation of the EQ3 SynScan Upgrade

I just got the Skywatcher EQ3 SynScan Goto Upgrade. It comes with lots of documentation. For example on how to wire up the controller boxes. However, it does not explain, how to mount the motors, that come with the upgrade box! And neither does the EQ3-2 manual.

Hence I will describe how I installed the motors. I don’t know if I did it correctly, but my SynScan seems to work, so I cannot be far off. If you use this description for assembling your own upgrade kit, you do it on your own risk! You have been warned… By the way, one screw was left over in the end. But isn’t it always?

So the first thing to do is to remove your telescope, your counterweights and the flexible tuning knobs. This leaves you with your tripod and your EQ3 mount. I am describing this for my EQ3-2 with aluminium tripod (rectangular legs).  If you have an EQ3, NEQ3 (round legged steel tripod) your mileage may vary. The manual first tells us to mount the holders for the motor controller and the SkyScan controller. The first one is a bugger: it’s made for the round legged tripod. But do not fear! We can use a rubber band to help it stay affixed to the aluminium legs. Make sure the ground plate has contact with the aluminium legs!

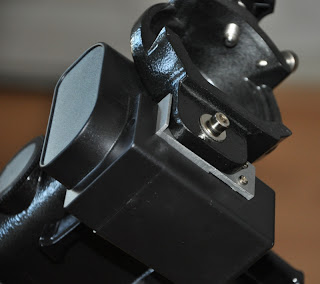
Next up are the gears for the motors. They are not labelled, so I had to figure them out myself. The big one is for the Dec motor, the small one for the RA motor. The motors themselves also were not labeled. The naked one is the RA motor, the boxed one is the Dec motor.

Ok, so we will begin with the RA motor. This is the place where it will be mounted:

There is already a screw here, and the axle for the gear. Mount the RA gear on the axle, so that it fits nicely with the end of the axle. This will be the right height for the RA motor gear. use the two small inset screws to firmly attach the gear. Make sure not to make it to loose, nor to tight! Then you can attach the RA motor as pictured on the mount point. The mounting plate will fit snugly into the corner of the mount, and will keep the motor in place. You can jiggle it around before fastening the screw, so that the two gears fit well together. Check the photos on how this should look from the front and behind.

You noticed that there is a cable hanging from the RA motor. Find the black casing with the two DIN sockets. It will have a fitting socket for the dangling cable. Attach both and put the casing on top of the motor and the gear assembly. Take good care to carefully wrap the coloured cables into one corner of the black box! They fit in there, without any trouble, but you have to find the right corner. If you managed to fit the box, you will see two screw holes ligning up on the front and top of the box.

Use the two tiny black screws to fixate the RA box. The top screw might be hard to reach, even with the small screwdriver that comes with the kit. I used a ratchet with a PH bit for this part.
Ok, that’s the RA assembly. Now for the Dec motor. The mounting point for this is on the other side of the EQ3. See the picture for details.

The mount point where the screw belongs is circled. first, attach the Dec gear. Leave about 1/2 mm space between the mount and the gear. Again, there are two small inset screws to fasten it. You can adjust the gear again later, if needed. Now attach the motor using a screw and a washer (they come with the upgrade kit). With both motors, test if the gears touch tightly enough, so they will not skip, and they will not have too much friction either. See the picture for a view of the mounted motor. Strangely, I could not get the Dec gear to be parallel with the motor gear. But still, the whole thing works. I might try to re-align it later.

That’s it! Now you only need to attach all the cables, as described in the manual, and you’re ready to go, or to go-to. 🙂 I still had one thing left: a black soft rubber thing. If anyone knows what it is for, please drop me a note. It was not described in the manual either.

Note to self: codesigning for OS X and iOS on the command line

As a reminder for myself, here is how you can codesign an OS X application for the AppStore on the command line:

codesign -f -s "3rd Party Mac Developer Application: Your Company" -v YourApp.app
productbuild --component YourApp.app /Applications --sign "3rd Party Mac Developer Installer: Your Company" YourApp.pkg

There is a lot more to do, of course, like having the correct bundle ID set, but this speeds up codesigning, if you do not use XCode to build your application.

For iOS it is pretty similar, except you don’t need the productbuild:

codesign -f -s "iPhone Distribution: Your Company" -v YourApp.app